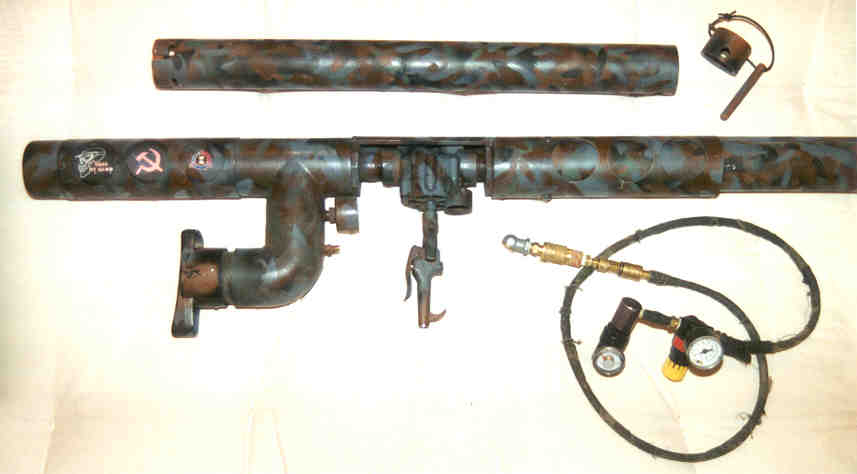
This page describes the Devastator-II LRS (LAWS Rocket System). This terminology is specific to the game of paintball . This is essentially a spudgun or pneumatic air canon that has been specifically designed for paintball play against tanks and buildings in scenario games. I am the canonsmith aka Dr Doom of the paintball scenario game team Dead By Dawn. You can reach me through my "E-Mail Dr. Doom" link at http://www.doomlabs.com or visit the roster, tech, or other galleries of http://www.dead-by-dawn.org.
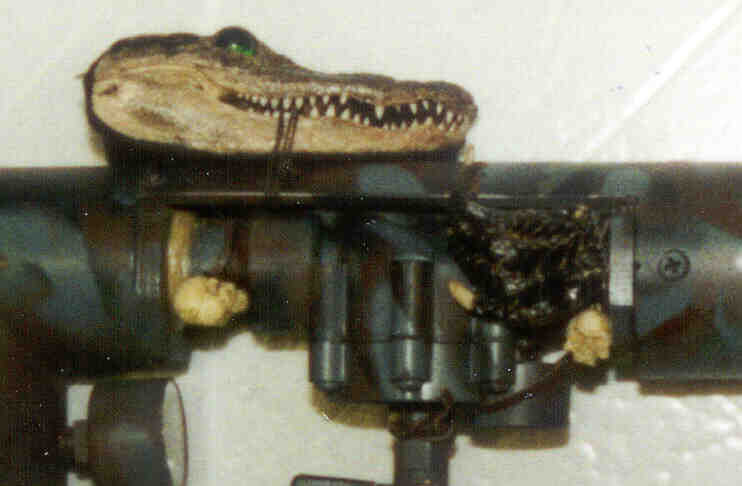
Of course, you've got to watch it when you loan out your equipment.
I
freely loan mine out to members of Dead By Dawn, but I am also not
surprised
when they come back modified, typically for a particular game. Here's a
picture
of the Devastator-II at it was returned after a game. It was all
Gator'd
out. Interestingly the head makes a great sight rail too! Note that
Mongo
also added gator feet as well as a couple of skulls for that true DBD
look-n-feel.
This document is structured as follows:
Specifications
Picture Gallery
Overview of Subassemblys
Construction
Ground Support
Effective DEMO/LAWS Play
The Devastator-II is comprised of the following integral and accessory sub-assemblies
Air chamber and shoulder stockYou will need ammunition and ground support equipment to support your LAWS / DEMO role
Air & Firing Valve Assembly
Twist Lock Receiver
Twist Lock Barrels
Air Fill System
AmmunitionYou will, of course, want to build one
Ground Support
Construction
PVC Techniques
Safety and Pressure Testing
The air chamber is integral with the shoulder stock. The top extension, the T, and most of the shoulder stock elbow comprise the air chamber. This folding of the air chamber helps keep the overall length short. One could perhaps shorten the overall gun by moving volume into the shoulder stock - but this design handles well with a reasonable amount resting on the shoulder.
The top portion of the air chamber is approximately 15" long from the endcap to the inside end of the valve mount bushing. Or, in other words, the cut piece of PVC is approximatley 10 3/4" long. The elbow is directly coupled to the T and adds about 4 effective inches of chamber length. The butt-stock portion of the elbow is not pressurized. Details of the buttstock internals can be seen in the next picture.
The air chamber volume is approximately PI * R**2 * length == PI * 1 * 14.75 == 46 cubic inches. This was derived from the theoretical volume of 12 grams of CO2 at 100 PSI. It's actually a tad smaller. This was based on the common use of 12 gram cylinders to power metal pipe LAWS. We must use larger chambers at lower pressures to stay withing the working limits of Schedule 40 pipe and sprinkler valves.
Also screwed in are a 150 PSI pressure gauge and a schreader fill valve. We will discuss air as a system later. Otherwise note that the gauge and valve are threaded into portions that are effectively double wall thickness.
The cooling shroud on the air chamber is mostly costmetic. It is a section of 2.5" electrical PVC pipe. In this case I milled it with a hole saw. 2.5" PVC fits nicely over 2" PVC but is a bit loose for this purpose. I ripped a saw kerf's width down the length on my radial arm saw. This kerf missing I was able to snugly clamp the shroud around the chamber.
The short piece of pipe holding the butt-stock is capped off inside the
elbow
with a 2" diameter of 1/4" sheet PVC. An air pressure safety valve (pop
off
valve) is installed for safety. This particular one pops at ~120
PSI
and vents the chamber down to ~40PSI. When dealing with CO2, HPA,
kids
and/or compressors without gauges such a safety valve is necessary. See
my
water rocket page for a true story of a friend's son blowing up a water
rocket
by not paying attention to the portable emergency air compressor they
were
using at the park. This also makes the field officials more comfortable
with
approving your LAWS when you can show that your design is well thought
out
and inherently safe. The shoulder piece itself is a CO2 tank butt stock
for
a 12 oz tank.
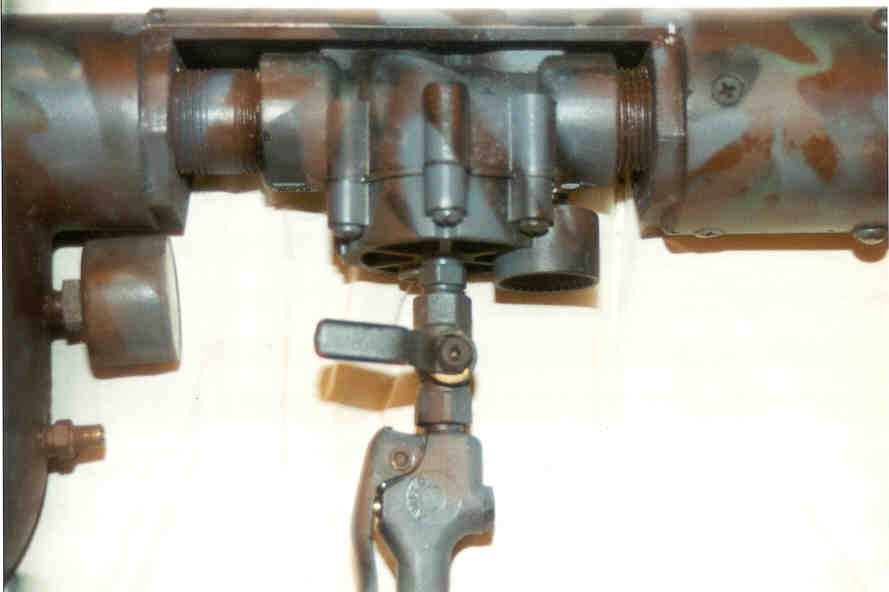
This assembly is comprised of a modified sprinkler valve for the air
delivery
with a blow gun to actuate the pilot valve.
The valve is a 1" Rainbird electrical sprinkler valve. A 3/4" valve would likely give good service - but why bother when a 1" is only a couple of bucks more. I modified the valve by removing the solenoid and sealing up the solenoid air holes. I then drilled and tapped the center of the pilot valve assembly (the top portion seen upside down here) and installed a 1/4" ball valve safety followed by a blow gun for the actual grip/trigger. These modifications eliminate the need for batteries and provide a much faster lock time than either large ball valves or this valve with the solenoid. The reason is that sprinkler valves are designed to open relatively slowly to help prevent water hammer effects.
The sprinker valve is coupled to the air chamber and the receiver with 1" iron couplers. The rear coupler could be a close coupler as the front coupler is but I wanted to leave some flat, unthreaded room for subsequent drilling and tapping of who knows what later.
If metal couplers are used then the top strap is not necessary. In this case it provides a nice finished look as well as an uninterrrupted sight rail down the length of the cannon. Note that if you use a top strap then you must be confident of your assembly skills as you won't be able to easily fix air leaks in the threaded area.
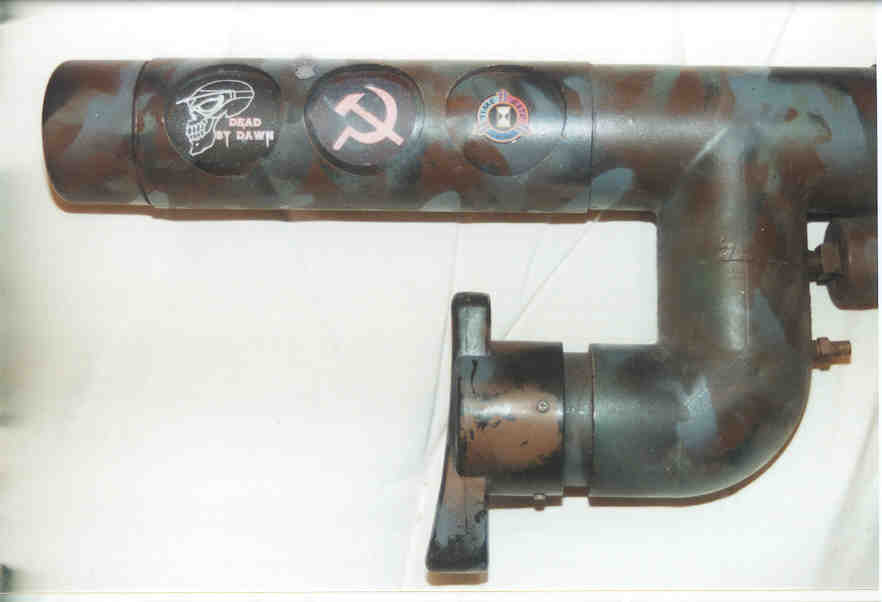
The receiver is a section of 2.5" electrical PVC. It happens to be a decent sliding fit over 2" PVC. It's been drilled out for decoration and lightening and the top strap of the valve assembly is integral to this piece. It is coupled to the valve with a 2" PVC bushing.
Looking outside on the above piece you can see the heads of the bolts that you see on the interior of the following picture.
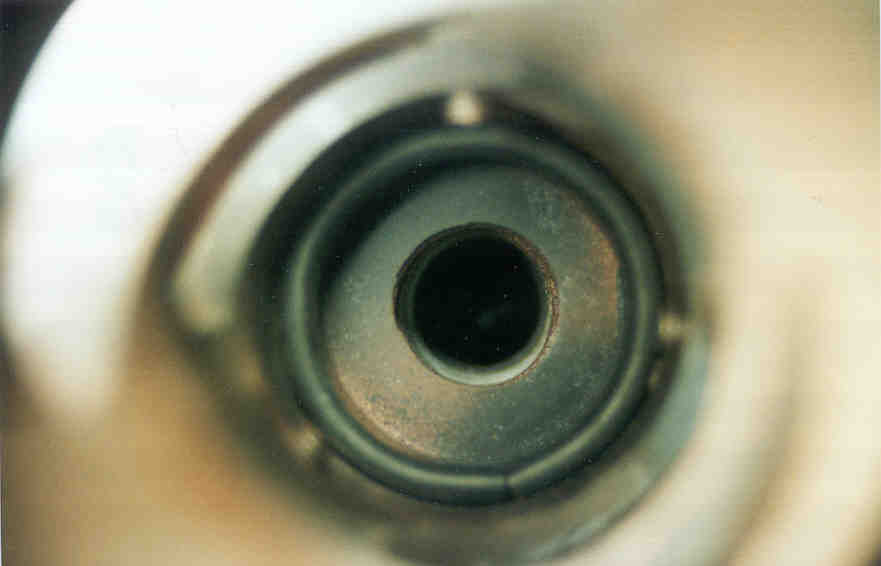
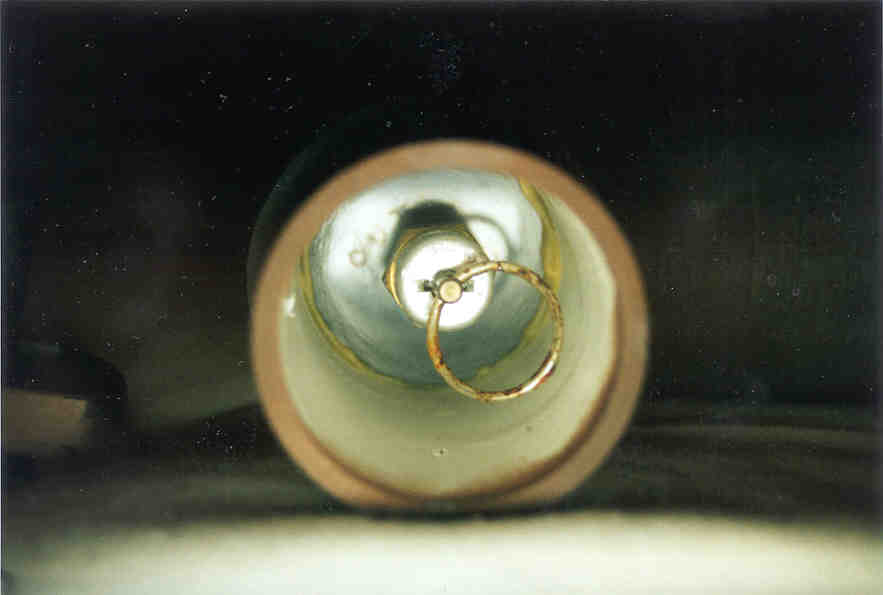
This picture shows the inside of the receiver. You can see the three 1/4 x 20 screws that comprise the twist lock lugs. You can also see the air seal o-ring. This o-ring is a section of hollow o-ring from a drywall mud bucket lid. The hollow rubber has more give than a solid o-ring and helps compensate for any slop in the twist lock grooves.
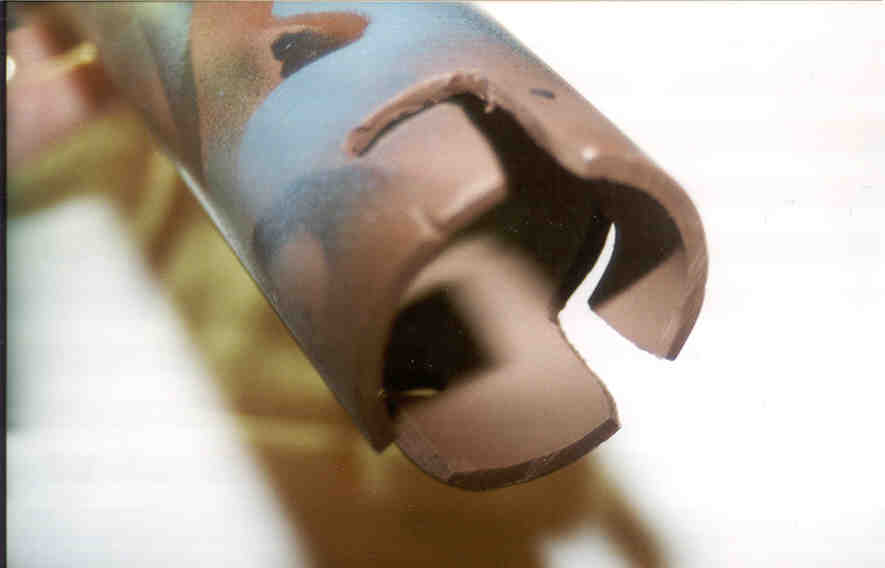
The ends of the barrels have twist lock grooves cut in that match the 1/4 x 20 twist lock lugs in the receiver. They are cut to slightly compress the o-ring for a good air seal. Note also that the cosmetic milling of the reciver must not overlap the twist lock grooves of the barrel. This is the leakiest part of this system as some air will leak when the wadding is propelled down the barrel uncovering the twist-lock grooves. This system proves acceptable for paintballs loads and potatoes. It would likley prove somewhat leaky if one were firing significantly heavier projectiles.
The barrels are 2" PVC. It's not strictly critical that the barrells be pressure rated - but having only pressure rated pipe around prevents accidental unsafe buildups with non pressure rated pipe. 2" ABS would be acceptable - and would have the advantage of not strictly requiring a paint job.
You should not use thin wall pipe as there would not be enough thickness to consistently engage the twist lock lugs without having the twist lock lugs extend into the wadding (which would tear it up).
You should also leave an adequate groove length with a moderatly small twist. This ensures the locking lugs are strong enough. The lugs you are viewing now were almost broken by someone ramming, rather than cutting a potato, when loading up the barrel. If in doubt err on the side of safety.
The Devastator-II is filled by a low pressure air system. the use of a schreader valve makes it difficult to use anything but low pressure air. The pop off safety valve in the stock prevents explosive disassembly in the event high pressure air is somehow applied.
PVC pipe is not as strong as metal. It shatters when it fails and the little pieces are an ongoing tedious excercise for the hospital staff. It is therefore imperitive that only pressure rated pipe, couplers, valves, and other components be used. It is imperitive that proper preparation, glueing techniques, glues, drying time, and pressure testing be used to ensure strong safe joints. When properly assembled PVC LAWS are as safe as the operator.
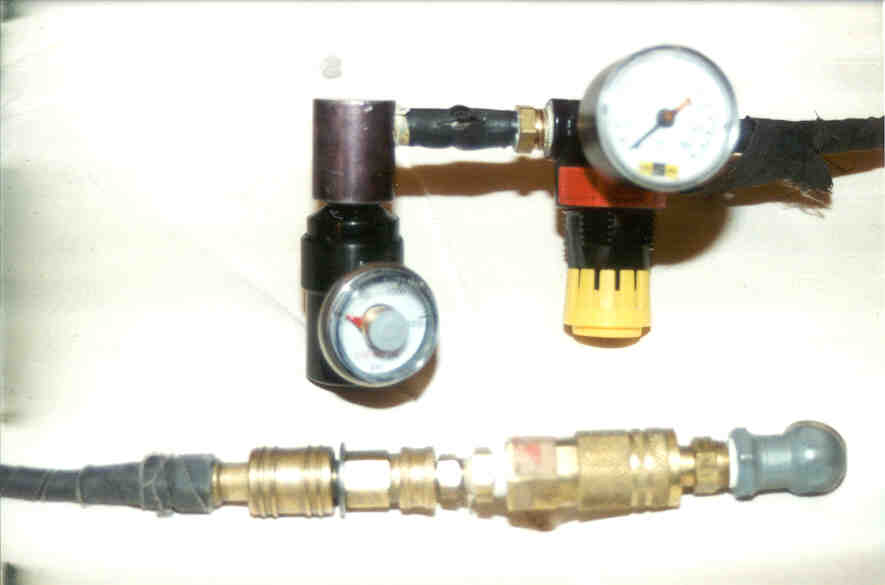
This air system was built up mostly from the junk box. you can build up your own system as long as you ensure the proper pressure regulation occurs in a safe manner.
This system has a CMI R-2000 CO2 regulator. It's set for 250 PSI and feeds an air compressor pressure regulator that happens to have a max input pressure of 250 PSI. This feeds an old remote hose with a slide check quick disconnect. The quick disconnect is adapted to a schreader fill.
The secondary regulator, the low pressure air compressor regulator, is used to set the velocity. I find that 100 PSI yields a hair under 230 PSI and I rarely have to adjust the regulator.
Note that PVC is sensitive to and is substantially weakened by cold. It is imperitive that a remote and/or expansion chamber be used to prevent CO2 expansion from chilling the PVC. A primary regulator with good liquid CO2 blocking capability is desire particularly if a remote is not used.
If the LAWS is properly assembled one can charge it, set the ball valve safety (you installed one - right ?), and execute your DEMO/LAWS role with a ready to fire weapon. It is only in the occasional (more frequently than anticipated!) need for a quick second shot that that this remote air system can be slightly cumbersome.
I plan on adapting this for onboard constant air and have begun engineering the CO2 tank mounting. I may use the current regulators or may switch to a Palmer Stabilizer. The Palmer Stabilizer, particularly with a factory low pressure spring kit, can be used as a single stage only regulator for CO2 to feed a LAWS. One must still be concerned with PVC cooling but I have ideas on how to mitigate that problem.
Remember - install that safety valve permenantly in the air chamber assembly. This is especially necessary for safety if on board or CA CO2 is used.
The shotgun effect is certainly a compromise. On one hand the dispersal makes it difficult to get enough balls on a target at realistic engagement distances. Often one merely disables or immobilizes the tank and must follow up with a 2nd shot - often while taking tank and infantry fire. On the other hand, it can be difficult to hunker down and sight down the barrel while wearing that mask (hint - practice in your backyard with your mask on). It can therefore be easier for anybody to pick it up and hit a tank without any practice.
Shotgun loads must naturally be kept in the barrel with wadding. You will need a thick rear wad and a thin front wad. The thick rear wad serves two purposes. It provides an air seal against the paintballs and it also cusions the paintballs against the very strong accelleration they experience. The front wads serve only to keep the paintballs snugly in the barrel while on the field. I cut rear wads in two to make front wads.
I find some people use a roped wadding system. This keeps you from losing your wadding and may be required by some fields. I find this cumbersome as the rope is a tangled mess in the woods. In addition, you are typically out of play while handing your LAWS card to the ref for your kill so you can recover your wadding at that point.
Wadding is discussed further in the Ground Support section.
I have found toilet paper rolls can be slit to form casings for 1.5" barrels while 2" shells are typically assembled using plastic dixie cups. These keep the paintballs together until impact and are highly accurate and effective. They also pack a wallop so I don't use them and most fields don't allow them.
I have also heard of people hot-glueing paintballs together. I have not tried this but it would eliminate the need for a casing. One would build up the shell inside a section of barrel casing.
I have also not had much luck building sabot rounds - it seems too difficult to strike a balance between something that will come apart at these relatively low velocities yet stay together for on and off field handling. I have had some limited success with foam donut casings with loose foam end wads. These lower the paintball count but do seem to keep the pattern a bit tighter. They also seem to drop off quickly enough. These warrant further investigation.
I score foam assemblies from my work location's shipping room. These are used for monitor, computer, etc, packing and they throw a lot of this away. If you don't have a source then find a business park and talk to the folks on the shipping dock (skipping the front desk in most cases). These folks are typically interested in what you're up to and will likely give you all you want for nothing. You'll likely have to promise to bring your LAWS by sometime for them to see.
You'll need to cut round wads out of this foam. This is relatively easy to do as the foam tears just enough when abraded while retaining enough spring to still seal well in the barrell. I made a foam cutter out of a section of scrap barrel pipe.
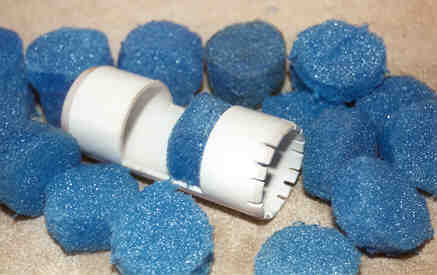
Note that the cutting edge is merely just slits cut into the end with my dremel tool. All you're doing is really tearing small bits of the foam so it doesn't need to be extremely sharp. The cutter is quite safe if twisted into your hand. Note I cut a relief hole in the middle. This just makes it easier to pop out the wads after you've cut them. In this picture you'll note there is no end cap. Add and end cap as your palm will get a bit sore while cutting a bag of wads.
To cut the wads just push the cutter into the foam with some pressure and, while maintaining pressure, twist the cutter round and round or back and forth. You'll think it's relatively slow work but you'd be surprised at how many you'll cut out while driving (passenger!) to the next game or just watching TV.
You'll now have a large bag of rear wads. They're about 1.5 - 2" thick. To make front wads just cut some of these in two with a sharp knife.
I borrowed (and will try to bum :) ) a surplus military belt bag. In this I carried about 5 or 6 wadding sets and a tube of paint. You should carry more than one set of wadding in easy reach as it's easy to fumble them in the heat of a fast reload while taking fire. So carry more and forget while you fumble until you perhaps have a chance to recover them.
You'll therefore need to keep this paint separate from any other gun paint you're carrying. I keep a 100 round loader in my wadding bag and a spare in a specific location ( always!) in my paint pack if I'm carrying.
100 rounds is enough for 4 follow on reloads and even considering the occasional back to back reload is an adequate amount for primary loading. Just remember to take advantage of down time to keep everything topped off.
I found myself needing the quick 2nd shot more often than not. Sometimes because I only disabled the tank on the first shot, but also on two occasions in the same game I found myself up against two tanks at the same time. After blowing the first tank my cover was blown and the 2nd tank driver rightly determined that I was now his primary target and focused on eliminating me. Now that's a trip! The first time I eliminated the 2nd tank by luck as he rightly had me ( I hadn't realized he backed up to get me) and the 2nd time I just sought enough cover to drop the first barrel, load the 2nd, and eliminate the tank.
I did find carrying the 2nd barrel somewhat cumbersome but liked the fast 2nd shot. Your choice but be less aggressive and always plan for a 2nd shot.
In my first game, with the Devastator-I, I learned that LAWS paint may not be available for logistical reasons. I learned the many weaknesses of the Devastator-I. I did, otherwise, get to be tank gunner once, with an early variant of the Devastator-II, in the Battleship Apocalypse tank in the 2001 MOUT game.
In my second game, really the first "real game", I made sure I knew how to get laws paint and acquired it early. I had ditched the rope wadding and had otherwise practiced in the backyard. This game was the 2001 Timegate Grand Finale at Wayne's World (see gallery at www.dead-by-dawn.org). I learned even more this game, often forgetting I could blow buildings (for offense and defense), but still racked up 8 tank kilss, some back to back (exciting!) and a number of bunker kills as well.
I think I may have found my calling in paintball - that of DEMO/LAWS
role
(hence Dr Doom) but I keep learning how to be more effective.