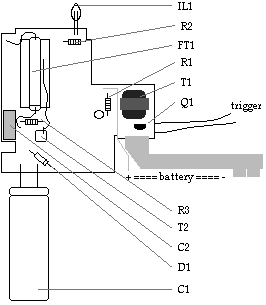
Figure 1 - Drawing of the flash
circuit board, component side

Figure 2 - Flash circuit schematic
diagram.
by Dennis Griesser
CD Firing Box From Salvaged Parts
- part 1, Basics
"Beware the lightning that lurks in an undischarged capacitor, for it can cause thee to bounce upon thy bottom in a most ungentlemanly fashion." - Unknown
The problem
Capacitor Discharge firing boxes are well suited to certain types of electric match ignition and ill suited for others. Experimenting with this technology can be fun and educational, but the cost of a commercial CD firing box can be prohibitive.
CD firing boxes are electrically similar to photographic strobes. Can the strobe unit from a disposable camera be modified to serve as a CD firing box?
Background
For more information on Capacitor Discharge firing boxes, consider perusing the following articles:
Safety precautions
CD circuits work by generating a high voltage, storing it for later in a capacitor, and discharging it all at once. The high voltage is potentially dangerous and the sudden burst of energy from the capacitor is potentially lethal.
The combination of high energy and sudden release thereof make CD circuits as tricky to handle as flash powder. Know and follow the precautions appropriate for high energy electronics.
Once the strobe circuit board is exposed, it is easy to note stay away from the dangerous parts (all parts are dangerous). While the disposable camera is being dissected, take care that you don't touch the circuitry by accident. It might be a good idea to wear rubber gloves during this process. Eye protection is a good idea, in case plastic parts or springs jump out.
Avoid touching the flash lamp's glass envelope with your hands. Skin oils will stay on the surface, trap energy, and cause hot spots that might cause the lamp to shatter.
Do not look directly into a flash lamp as it fires. The intense light, rich in UV, can damage your eyes.
Selecting a disposable camera
There are numerous manufacturers and models of disposable cameras. They are probably all convertible to CD firing boxes, differing only in the nature of the changes necessary to do the conversion.
In order to be able to provide exact directions, this article deals with just one particular model, the "Kodak FunSaver 35 with flash". The camera is 120 mm wide, 55 mm tall, and 30 mm deep. The plastic body of the camera is boxy, with square edges. The body is enclosed in a cardboard box. It has a switch that you slide and hold to charge the flash.
The article does not deal with the "Kodak FunSaver Pocket", which is slightly smaller, has rounded corners, and has the plastic box partially wrapped in a sticker instead of a cardboard box. The FunSaver Pocket uses an entirely different flash circuit. You press a button to start the charging process, and the camera recharges itself after every shot. The automatic recharge is a hazard rather than a feature when making a single-shot firing box.
If your camera differs in any way from the one described in this article, you may have the wrong model, or Kodak might have changed their design. In such a case, you are on your own. Proceed with extreme caution.
Salvaging the flash electronics
Remove the plastic camera body from the cardboard box. Discard the box. Check the battery compartment in the underside of the camera. If the battery is missing put one in; a 1.5V AA penlight cell, a picture engraved on the case shows which way it goes in. Find the "charge" switch on the front of the camera and slide it to the "on" position and hold it there. Watch the "ready" lamp until it goes on and stays on steadily. Release the "charge" switch. Now remove the battery and save it for later use. Point the camera away from you and release the shutter. The strobe should flash and the "ready" light go out. This accomplishes two things: we now know that the unit contains usable parts; the energy storage capacitor in the strobe is now mostly discharged. It is time to dismember the camera. This is a good time to put on rubber gloves. The energy storage capacitor in the strobe still contains about 40 volts, which is plenty to throw a nasty spark.
Hold the camera with the back facing you, as if about to snap a picture. The right side is a compartment that holds the take up spool. If the photofinisher hasn't already pried the door off the compartment and discarded it, do so. Then grasp the right side of the back and pry that off the rest of the body; it has two latches along the bottom and two along the top. Pull hard enough and the back will open like a door, hinged on the left. Pull the hinge tabs out of their slots and throw the back away. This exposes the feed reel in the left compartment. Throw that away. Pry off the clear plastic top and discard; there is one latch in the back and three in the front. Molded extensions of the clear plastic top also reach down and hook into gears and springs. You might need to pry with a screwdriver. Little gears may go flying into space; protect your eyes.
Turn the camera around so that it is facing you, as if to take your picture. You want to remove the plastic piece that covers the front. Examine the left edge and you will see a space between the front cover and the front of the chassis. Pry apart at that point and it will snap, lifting up a little. Keep tugging and it should snap again, the whole front coming off in your hand. Throw it away, along with any loose parts that fall or shoot out.
The right one third of the camera contains the flash circuitry on a board that is roughly rectangular, with an extra finger extending towards the left. Now we have to get it out without getting electrocuted.
The shutter assembly is halfway down the front of the body and about one third in from the left. It has two red trigger wires going from metal contact strips over to the flash circuit board. Using insulated diagonal cutters, cut the trigger wires from the shutter contacts, leaving the wires that attach to the circuit board.
Locate the latches that hold the flash circuit board to the body and cut them off; there is one on the left finger of board that extends towards the shutter and another on the top right corner. Then turn the camera over on a soft insulated surface, letting the board fall out. Dispose of the body and any leftover parts. The circuit board and attached electrical components are all that you want to keep.
Take a resistor, anywhere from 3K to 15K and 2W or better. Use two pairs of insulated clip leads to put the resistor in parallel across the large energy storage capacitor. This will dissipate the remaining charge in the capacitor. Measure the voltage across the capacitor. When it hits zero, which should only take a few seconds, you can take off the rubber gloves.
So, what do we have?
Figure 1 depicts the circuit board
for the flash, as salvaged from a FunSaver. A reverse-engineered schematic
diagram appears in figure 2.
Figure 1 - Drawing of the flash
circuit board, component side
Figure 2 - Flash circuit schematic
diagram.
Do not be tempted to follow the schematic and cook up one of these from scratch. Inverter and strobe circuits often use oddball components, especially transformers. It's much easier to find one of the disposable cameras and cannibalize it.
Understanding gas discharge tubes
The circuit contains two gas discharge tubes. Understanding how they function is the key to operation of a photographic flash unit, and thus how the flash can be modified.
We will start with a discussion of the common NE-2 neon lamp. This is a small tube that has two leads that go through the bottom of the glass envelope and attach to metal electrodes inside the lamp. The neon gas that separates the electrodes within the tube makes a poor conductor of electricity. You could try all day to pass 75 volts through the NE-2 and it would act like an insulator. But if you crank the voltage up high enough, the gas ionizes and suddenly turns into a good conductor of electricity. This is called the "turn-on threshold" voltage, and is roughly 90 volts for a NE-2. We would see that as an orange glow in the tube, and a meter would indicate that there is plenty of electricity flowing through what was formerly an insulator.
Once the tube fires up, it continues being conductive, even if the voltage is reduced below the turn-on voltage. When you drop to about 60 volts, the NE-2 goes out. This is the turn-off threshold. In order to start it up again, you must get back up to the turn-on threshold. This is an example of the phenomena called hysteresis.
The flash circuit uses a miniature neon lamp, similar to the NE-2, for the "ready" light. The lamp is actually about half the size of a NE-2 and has a higher turn-on threshold of roughly 180V.
The other gas discharge tube in the circuit is the flash lamp. It is a thin cylinder 22 mm long, filled with xenon gas instead of neon gas. The electrodes exit at opposite ends of the tube. Like the other gas discharge tubes that we have discussed, the xenon lamp has a threshold at which it will suddenly begin to conduct electricity, but the turn-on threshold is even higher for the xenon flash lamp. Just like the neon lamp, it acts like an insulator until you hit the threshold, then it ionizes and conducts well, even at a subsequently reduced voltage. The nice thing about the xenon tube, however, is that it makes a nice white light that is well suited for photography.
If you so desired, you could make a flash unit that worked by accumulating energy in a storage capacitor until the turn-on threshold voltage of the xenon lamp is reached. It would then fire, producing all of that nice light. This is a bit of a problem because it takes awhile to generate a high enough voltage to fire the lamp and store enough energy in the capacitor to make the flash long enough to be useful. So you might press the shutter release on your camera and a little while later, the threshold would be reached and the flash would go off, too late to do any good.
One could put a switch between the storage capacitor and the tube. The capacitor could then be charged in advance to well over the turn-on threshold of the flash lamp. Since this part of the preparation, it doesn't matter that it takes a few seconds to build up this potential in the capacitor. Closing the switch would then fire the lamp. The problem with this approach is that a huge amount of energy must be switched. This requires a switch built and rated for large current spikes and high voltages (read "expensive switch").
Most photographic strobes use a bit of a trick. They put a voltage across the xenon tube that is lower than the turn-on threshold, but higher than the turn-off threshold. Nothing happens because the turn-on threshold has not been reached. Now, if only you could start the xenon tube conducting, it will continue to conduct and produce light. All it needs is a kick. This is done by introducing a third electrode to the tube, aptly called the trigger electrode. When the shutter is released, a high voltage pulse is applied to the trigger electrode. The pulse is high enough to start ionizing the tube, but doesn't have enough oomph behind it to produce a usable quantity of light. But awhile ago, we set up a potential that was just waiting for somebody to give it a kick, and the flash lamp burns until it drains enough energy from the capacitor to make the potential across the xenon tube drop below the turn-off threshold.
Analysis of the original circuit
Transistor Q1 acts as a switch, turning power on and off to the primary of transformer T1 in accordance with feedback from that transformer applied to the base of Q1.
The oscillation applied to the primary of T1 produces a high voltage at the secondary. This is half-wave rectified by D1 and stored in capacitor C1, which charges to roughly 350 volts.
While C1 is charging up, C2 is also charging, through R3. When C2 reaches approximately 190 volts, neon lamp IL1 starts to glow.
At first, IL1 may blink on and off. This is because when C2 accumulates a potential sufficient to turn on IL1, the lamp fires, draining energy from C2 until it reaches the turn-off threshold and IL1 goes off again.
When C1 charges to roughly 225 volts, C2 charges from it at least as fast as IL1 drains power from C2, and the "ready" lamp stays on solid.
Releasing the shutter closes SW2, dumping all of the energy from C2 into trigger transformer T2. This produces an output pulse of approximately 4,000 volts, which is applied to the flash lamp trigger electrode.
The high voltage trigger pulse ionizes the xenon gas in the flash lamp, which begins conducting. Most of the energy in C1 is poured into the xenon lamp, stopping only when the capacitor is exhausted enough that its output voltage falls below the xenon lamp's turn-off threshold of about 40 volts.
Continued...
So far, we have taken apart a disposable camera, salvaged the strobe unit and figured out what's there and how it works.
In the following parts of this article, we will build two different kinds of CD firing box from the salvaged strobe unit.
Thank you for visiting. Your comments are welcome.
![]() . . . . . .
. . . . . .![]() . . . . . .
. . . . . .![]()